That blue checkmark isn’t just a status symbol anymore. It tells people your account is real and Instagram checks a lot before handing it out. That small check mark can be the difference between someone trusting your DMs and someone assuming you’re a scammer.
Most of my clients got approved within a day. Others got rejected two or three times before we figured out what was going wrong. After seeing enough applications, I started noticing what usually works and what doesn’t. That’s what this guide is based on.
So here’s what actually matters if you’re trying to verify your Instagram account in 2026, based on what I’ve seen work and what I’ve watched fail.
Why Do People Get Verified On Instagram?
A verified badge tells people your account is the real one. It appears next to your name, and people usually notice it straight away. On a busy feed, that little blue check can give someone enough confidence to click on your profile.
New visitors trust a verified page faster. They know it’s not a fake copy of someone else’s account.
Brands trust it too. A brand manager will pick a verified page over an unverified one, even if both have the same number of followers. When budgets are on the line, verification helps people trust the account much faster.
Look at Aimee Song’s profile. The blue badge sits right next to her name, and her bio is short and clear.
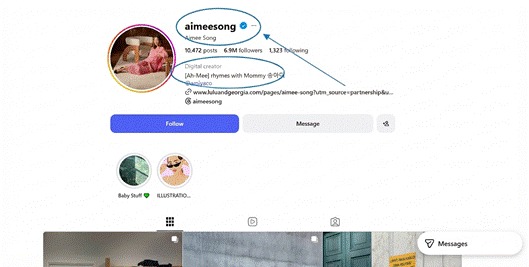
Aimee Song’s Instagram profile, showing the blue verified badge next to her username and a clear, complete bio.
Difference Between Meta Verified And Legacy Verification
Most people mix up the two options. That’s why so many applications get rejected.
Meta Verified is the paid route. You pay a monthly fee, upload your ID, and get reviewed fast, often within a few days. It’s designed for regular creators and small businesses who don’t have press coverage but still want the badge.
Legacy verification is free, but it’s strict. Instagram only gives it to accounts they see as truly notable. There’s no set timeline, and most people who apply get turned down. Instagram reserves it for public figures, journalists, and brands that already show up in search results and news coverage.
If you don’t already have press coverage or public recognition, skip legacy verification. Go straight for Meta Verified instead.
Studio McGee is a good example of the notable side. With 4 million followers and a well-known design brand, the account clears the bar for legacy verification without needing a subscription.
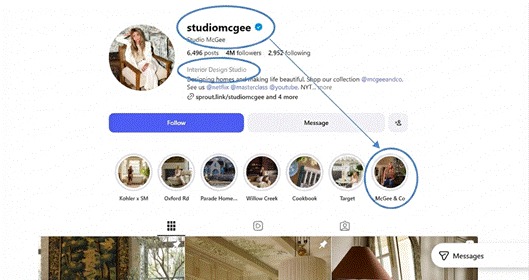
Studio McGee’s Instagram profile, verified through the notability route thanks to their established brand presence.
Then there’s an account like The Rock’s. With 382 million followers and a badge that’s been there for years, it’s the clearest example of legacy verification at its biggest scale.
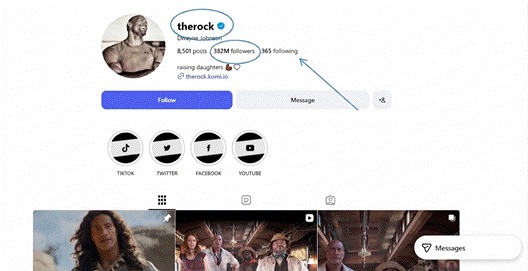
Dwayne Johnson’s Instagram profile, showing legacy verification at the scale it was originally designed for.
What You Need Before You Apply for Instagram Verified Badge
Your account needs to look active before you even open the subscription screen. This is the step most people skip, and it’s why they get rejected. Reviewers want to see an account that’s been active for a while, not one that was put together just before applying.
Make sure your account is at least 30 days old. Add a bio, a profile photo, and a few posts.
Check that you meet the minimum age for Meta Verified in your country. Your account also needs to be set to personal or creator, not restricted.
Once your account looks ready, the steps are simple. Open Instagram, go to Settings, then tap Meta Verified. The whole flow takes just a few minutes if your documents and account are already in order.
Pick the account you want to verify, choose your plan, and upload a government ID. Then submit and wait.
Review usually takes two to five business days. It can take longer if there’s a problem with your documents or if demand is high in your area. If a week passes with no update, checking your email and app notifications is worth doing before assuming something went wrong.
Try to apply from a laptop or a newer phone. Old phone cameras often compress ID photos too much, and that’s one of the biggest reasons for rejection.
If you’re also trying to grow your account before you apply, check out my guide on how to increase Instagram followers in 2026. It covers what’s actually working right now.
Do I Need Any Documents Before Applying?
Meta wants one government-issued photo ID. A passport, a driver’s license, or a national ID card all work. Make sure whichever one you choose is current and not close to its expiration date.
If you don’t have any of those, you can send two other documents instead. At least one needs to show your date of birth or a photo.
A birth certificate, a marriage certificate, a vehicle registration, or a utility bill can work here, as long as you pair it with a second document. The combination just needs to clearly confirm your identity and date of birth together.
Take a clear photo of your ID. Lay it on a dark surface, keep all four corners in the frame, and avoid using the flash. Blurry or angled photos are one of the most common reasons applications get rejected.
Why Verification Requests Get Rejected
After doing this with a lot of people, I keep seeing the same few mistakes.
Blurry or angled ID photos are the biggest one. Meta’s system can’t read them, so it rejects them right away. Take the photo in daylight if you can, since natural light avoids the glare that phone flashes tend to create on plastic ID cards.
A name that doesn’t match your ID causes trouble too. So does an account that changed its username or photo too many times recently.
An empty profile with no bio or posts looks inactive to a reviewer. And an expired ID gets bounced instantly, no matter how good the photo is. Double-check the expiration date before you upload anything, since it’s an easy detail to overlook.
If you get rejected, don’t just resend the same documents. Read the message Meta sends you. It usually tells you the exact reason. Fix that one thing, then try again.
So Which Route Should You Actually Pick?
For most people in 2026, Meta Verified makes more sense. You do have to pay for it, but the process is quicker and much easier if you meet the basic requirements. If getting verified sooner matters to you, the monthly fee is often worth it.
Legacy verification only makes sense if you already have real press coverage or public recognition. For most creators, that bar is too high to chase.
The time difference between the two routes makes the choice even clearer.
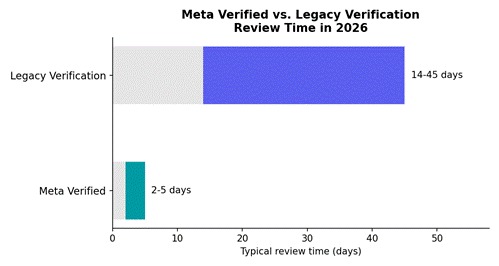
A rough comparison of how long review typically takes for each verification path in 2026.
Does Being Verified Actually Help You Grow?
It doesn’t boost your reach directly. Meta has said the badge isn’t a ranking signal, so your posts won’t suddenly get pushed further. If growth is your only goal, verification alone won’t get you there.
What it does do is help people trust your account faster. People are more likely to follow, buy from, or engage with a profile that looks established. From what I’ve seen, the badge alone can make a noticeable difference.
If you’re starting from scratch and want that trust sooner, SwapSocials can help. We sell real Instagram followers and established accounts, so you don’t have to spend months building a profile from zero.
It also helps to keep your profile active and post regularly before you apply.
Want to grow the account yourself first? Check out my 15 proven tips to get more likes on Instagram for simple tactics that actually work.
What to Do If You Get Rejected More Than Once
It happens more than people admit. Don’t panic, and don’t keep sending the same documents hoping for a different result. Multiple rejections usually mean one small detail keeps getting missed, not that the account is somehow blocked.
Read the rejection reason closely. Fix that specific issue, and retake your ID photo if the quality was flagged.
Give it some time before you apply again. Keep your posting steady in the meantime. Sudden bursts of activity right before reapplying can look suspicious to Meta’s review system.
For more on keeping your account in good shape while you sort this out, check out my guide on why Instagram accounts get suspended and how to fix it.
A Few Things to Check Before You Apply
Make sure your profile photo and bio are filled in. Have some posting history behind you, and avoid changing your username recently. A steady, consistent presence reads as trustworthy to both reviewers and everyday visitors.
Get a clear, well-lit ID photo ready. Check that the name on it matches your display name closely.
Confirm your account is set to personal or creator, not restricted. Spending a minute checking these details can save you from an unnecessary rejection.
A Few Questions People Usually Ask
Is Meta Verified worth it for a small account?
If you want trust fast or you’re dealing with impersonation, yes. If you’re only chasing the badge for status, the monthly fee might not be worth it yet. It’s worth asking what problem you want the badge to solve before you pay for it.
Can you lose the badge once you have it?
Yes. Breaking community guidelines, misleading people, or letting your subscription lapse can all get it removed. Just stay active and don’t break the rules, and that’s really all it takes to keep it.
Does it boost your reach?
Not really. Meta has said the badge doesn’t change how far your posts travel. It simply makes your profile look more credible.
Is buying an already-established account worth it?
It can be, depending on your goals. It skips the wait and the risk of rejection entirely. SwapSocials’ account listings include established and verified accounts, if that route fits your timeline better than applying yourself.
How long does Meta Verified take to review?
Most applications are reviewed within two to five business days.It can take longer if Meta is busy or if something is wrong with your documents.
Can I reapply right after getting rejected?
You can, but give it a few days. Fix whatever got flagged, then try again once your account looks steady.
Do I need a business account to get verified?
Not at all. Meta Verified works for personal and creator accounts too, as long as you meet the basic requirements like age and account activity.
Final Thoughts
After helping creators through this process, one thing has become pretty clear. Getting verified isn’t about luck and it isn’t about how many followers you have. It’s about showing up prepared and treating the process like the review it actually is.
It comes down to picking the right path, having clean documents ready, and fixing the exact issue if you get turned down the first time.
Check your eligibility before you apply. Keep your ID photo sharp. Don’t let one rejection stop you from trying again.
Still deciding whether to grow your own following or buy one instead? My post on how to buy Instagram followers walks you through the whole process, step by step.